SimHub Guide: Buttkicker Setup

SimHub Guide: How to set up your Buttkicker
Contents
1 – Introduction to SimHub
2 – Physical Setup
3 – Software Setup
4 - Conclusion
1 – Introduction to SimHub
"SimHub is a free program where you can add external hardware to your simulator. From dashboards to bass shakers, many possibilities are available and everything is modular." - SimHub - https://www.simhubdash.com/
 SimHub is one of the most popular sim racing programs at the moment, and for good reason! You can use this PC software to pull telemetry from supported games and select certain effects to be activated. There are plenty of other amazing features that SimHub offer, however in this article we will be focusing on setting up Buttkickers and using the Gamer 2 as an example.
 SimHub is very user friendly and most of these effects that you can see in the above picture have good default settings to get you started, there are plenty of advanced settings too for fine tuning and you can also input custom effects! We recommend having 3-5 effects turned on, you want a nice balance of clearly defined effects so you can really feel what is happening and then you can use this to your advantage for pace or immersion. If you have too much happening at once it can be hard to determine what effect you are feeling.
2 – Physical Setup
To set this up physically, simply follow the Buttkicker Gamer 2 manual accordingly. The only change you need to make is to use two separate sound outputs, one for your normal audio that you want to hear, and the other for SimHub to output noise to your Gamer 2 for vibrations. Most commonly you will use your green auxiliary output plug on the back of your PC, along with the auxiliary output on the back of your monitor or TV.

 3 – Software Setup using SimHub
Step 1 - Firstly you need to download the SimHub program and install it on to your PC - https://www.simhubdash.com/download-2/
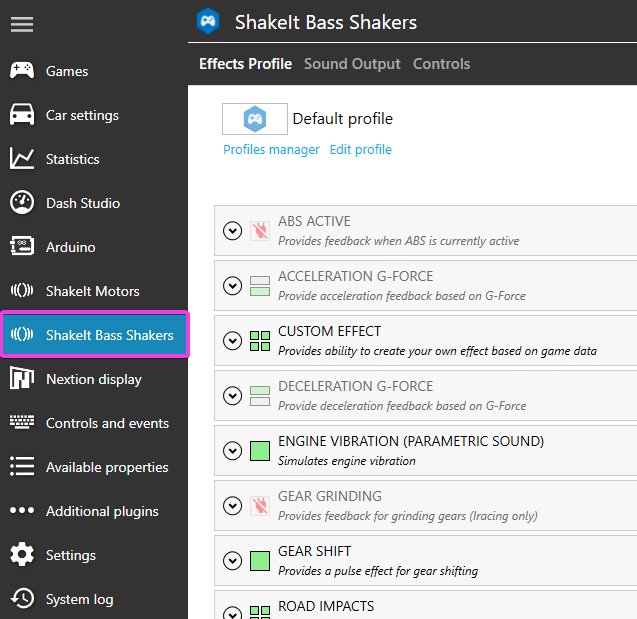
 Step 2 - Once you have SimHub installed, open it up and click on "ShakeIt Bass Shakers" on the left side menu column. Here is where you adjust everything to do with your Buttkicker and the related settings but firstly we need to assign the "Sound Output" correctly.
 Step 3 - Click on "Sound Output" near the top, then turn on the switch on the very right for your appropriate sound output channel that you want to use for your Gamer 2.
 Step 4 - Drop down the menu and select "Mono" as we only have 1 Buttkicker in use here. Now you can click "Test Now" and you should hear your Gamer 2 activate and make noise. If you do not hear anything, you most likely have the wrong output selected. Go back to Step 3 and try a different output, if you still have no success then check your physical set up.
 Step 5 – Now that we have SimHub firing correctly with the Buttkicker, click on "Effects Profile". Look through the list of possible effects and try turning on just a few to begin with. At this point you are good to go and now it is up to you to decide which effects you would like activated, trial and error is best here and it is down to personal opinion! We suggest starting with "Gear Shift" as this is a simple but awesome effect! Let's use this as an example.
 "Gear Shift" Example – Click the drop down arrow on the very left to see the below image. You can test each effect by clicking "Test" in the middle highlighted in pink. The "Pulse Duration" highlighted on the left is how long the gear shift vibration will be. Highlighted on the top right is where you can adjust the volume for this particular effect, and also you can change the Hz which is the tone of the vibration. It is also possible to raise the overall volume of the Buttkicker using the bo

Most of these effects in their default settings are a great starting point, most of the time you just need to adjust the volume of each one to your own personal preference and that is it. I would recommend using the following effects to begin with, remember try not to have too many going at once.
1 – Gear Shift
2 – Engine Vibration or RPMs (Very low volume is recommended)
3 – Road Impacts/Road Vibration/Simulated Road Texture (1 may be enough, try all 3 individually to see which is best)
4 – Wheels Lock or Wheels Slip

4 – Conclusion
Now that you have set up your Buttkicker, use the "Games" tab to launch your game! You need to launch your games through the SimHub software for it to be activated. Setting up Buttkickers is just one of the amazing features that SimHub offers, next time we will post an article focusing on "Dash Studio" where you can set up a phone or tablet to display real time gauges and telemetry!


